Click on the Logo to return to the homepage


Step 6: Tables

Tables are a very important element in web design. Very often they are used to structure the page design and to arrange content (for 
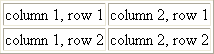
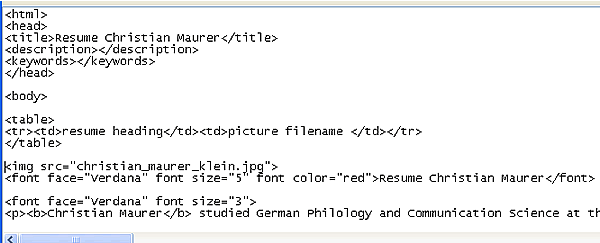
example text, pictures, menu items etc.) on a web page.
In the following exercise you will add a table to your web page in order to arrange your picture on the right hand side to your resume heading.

Tables:

A table consists of rows, columns and cells and the data contained in each cell. If you want to create e.g. a table with 2 columns and 2 rows like in the example below:

A table with 2 rows and 2 columns

The syntax looks as follows:

<table border="1">
<tr><td>column 1, row 1</td><td>column 2, row 1</td></tr>
<tr><td>column 1, row 2</td><td>column 2, row 2</td></tr>
</table>

The table is defined by the table tag <table> </table> and the attribute border defines the thickness of the table border. If you just leave this attribute the table border will be invisible.

The table rows are defined with the table row tag <tr> </tr> which stands for table row. If you want to create a table with e.g. 5 rows you have to insert the <tr> </tr> tags five times in your editor.

The table colums are defined by the <td> </td> tag which stands for table data. Every column is represented by one pair of these tags. The content for each cell is typed between the <td> </td> tags.


Exercise:

  1. Open your index.html file in your text editor.

  2. Copy & paste the following html tags into your index.html file right after the <body> tag.
<table>
<tr><td>resume heading</td><td>picture filename</td></tr>
</table>
  1. Your source code should now look similar to this:

Be careful when entering the html tags in your document! Syntax errors can happen easily!

  1. Cut & paste your resume heading plus the font tags which define it between the first two <td> tags in your table.

  2. Cut & paste the picture tag <img src="yourfilename.jpg> between the second two <td> tags of your table code.

  3. Your web page should now look like this example. If not compare the source code of the example with your source code.

  4. You have now successfully completed step 6 of this tutorial and can move on to the last step.

Copyright: Christian Maurer